
Bead crochet rope for beginners
Updated October 30, 2026
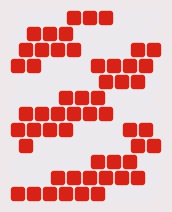
Bead crochet makes a flexible, weighty rope that is covered in beads on all sides. Because the beads are strung before you begin, the pattern forms as you work, often as a spiral or a repeating motif that wraps around the tube. It has a reputation for being hard to start. The first few rounds really are the tricky part, and it gets much easier once you have a tube to hold on to.
What you need
- Beads. 11/0 round seed beads are the classic choice, and 8/0 beads are easier for a first try. Cylinder beads also work, and give a tighter rope.
- Crochet cord. Size 8 pearl cotton is a good start for 11/0 beads, and a slightly thicker cord suits 8/0 beads.
- A steel crochet hook, about 1 to 1.25 mm for 11/0 beads, or larger for bigger beads.
- A big-eye or twisted wire needle to string the beads onto the cord.
- A clasp or end caps, along with a sewing needle and thread to finish.
How the rope works
The rope is a tube of slip stitches worked in a spiral, with one bead in every stitch. The number of beads in each round is called the around. Six is a common beginner size, and nine makes a thicker rope. Because the tube spirals, a simple pattern on the string can turn into diagonal stripes on the rope.
Step by step
- String the beads. Thread all the beads onto the cord, following the pattern. The first bead you string is the last one you will crochet. On a simple repeat such as six red and six white, you can just repeat the sequence.
- Start the chain. Make a slip knot on the hook, then chain one stitch with a bead in it by sliding a bead down, yarning over and pulling through. Repeat until you have as many beaded chains as your around.
- Join the ring. Find the first bead of the chain. Insert the hook under its thread, slide the next bead down and pull through both loops. The beads now form a small ring.
- Work the next stitch. Insert the hook under the thread of the next bead in the round, moving that bead to one side. Slide a new bead down, yarn over and pull through both loops.
- Keep spiraling. Repeat for every stitch. After a round or two, the beads stack into a tube, and each new bead sits on top of the bead it was stitched to.
- Check as you go. Every few rounds, make sure the pattern matches your chart. A missed bead shows up quickly in a spiral.
Many beginners find it helps to work the first few rounds with bigger beads and a contrasting cord, so that the stitches are easier to see.
Finishing the rope
When you reach the end, work a few stitches without beads, then cut the cord and pull it through the last loop. Use the tail to sew the end of the tube closed. You can then attach a clasp or glue it into an end cap. To make a seamless necklace, sew the two ends together by matching the pattern, with the cord running through the beads of each end.
How to read a rope chart
A rope chart shows the tube unrolled, like a flat strip. The repeat tells you how many beads the pattern takes before it starts over. The chart often comes with a stringing list, which is the part you actually follow. It lists each bead in order, so tick it off as you string. One wrong bead shifts the pattern for the rest of the rope.
How to work out the length
The length depends on your beads, cord and tension more than with any other stitch. To work it out, crochet a 5 cm (2 in) sample and count the beads you used. Use that count to work out how many beads to string for the full length, then add a few extras.
Common beginner problems
- The ring falls apart. This is common, and it is not a sign that you are doing it wrong. Start again with bigger beads, and hold the ring firmly between your fingers.
- Beads end up inside the tube. Slide each bead to the outside as you work. Check after each stitch until it becomes a habit.
- The rope is loose and floppy. Use a thinner cord, tighten your tension, or go down a hook size.
- The pattern breaks. Look for a missed or extra bead on the string, and compare the string with the stringing list.
Where to go next
Start with a two-color spiral, where a mistake is easy to spot. Once your rope looks even, try a pattern with a longer repeat, such as a zigzag.