
How to make beaded fringe earrings
Updated October 30, 2026
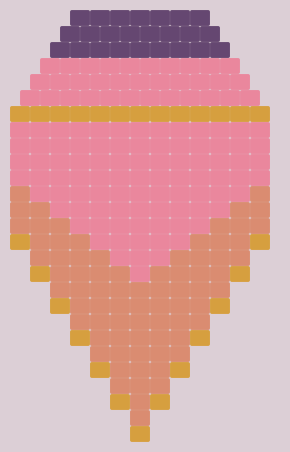
Fringe earrings are made of two parts: a small piece of beadwork at the top, usually brick stitch, and a row of loose strands below it. The strands move with every step, and they can carry a color fade or a V shape that would be hard to get any other way. If you can already make a brick stitch triangle, you are most of the way there.
What you need
- Cylinder beads, such as Miyuki Delica 11/0, in your chosen colors.
- Beading thread, such as a braided thread. Fringe puts more strain on the thread than flat work does, so choose a strong one.
- A beading needle, size 10 to 12.
- Ear wires and jump rings, with two small pairs of pliers.
- Small scissors, and a mat that stops beads from rolling away.
Start with the top
Stitch the top of the earring in brick stitch. Begin with a ladder, which becomes the bottom edge where the fringe will hang, and work upward so that the piece narrows into a triangle. Add the ear wire loop at the tip.
The number of beads in your ladder sets the number of strands, as each ladder bead carries one strand. A ladder of 13 beads gives you 13 strands.
Add the fringe
- Bring the thread to the first ladder bead. Weave through the beadwork until your thread comes out of the bottom of the bead at one edge.
- String the strand. Pick up every bead for this strand in chart order, from the top down. The last bead on your needle is the turn bead, the one at the very tip.
- Go back up. Skip the turn bead and pass the needle back through all the other beads in the strand, then up into the ladder bead you started from.
- Settle the strand. Gently pull until the strand hangs straight, with the turn bead sitting neatly at the tip. Stop before the strand goes stiff.
- Move across. Pass down through the neighboring ladder bead, ready for the next strand.
- Repeat for each ladder bead, following the chart for strand lengths and colors.
Every strand depends on the turn bead. Without it, the whole strand slides straight off the thread.
Making a V or a curve
The outline of the fringe comes from the strand lengths. For a V, make the middle strand the longest and remove a set number of beads with each strand toward the edges. Removing the same number each time gives a straight V, and changing the number gives a curve. Removing more beads makes the V sharper, while removing fewer makes it softer.
How to read a fringe chart
A fringe chart shows the top section as a normal brick stitch chart, with one column below it for each strand. Each column is a strand, read from the top down. Work out how the columns line up with your ladder before you begin, and count each strand against the chart as you string it. Mark your place as you go, especially if the strands use several colors.
How to size a piece
In a fringe strand the bead holes run along its length, so Delica 11/0 beads give you 7 to 8 beads per centimeter. A 40-bead strand therefore hangs about 5 cm (2 in). Hold the earring up to your jaw and neck before you settle on a length, since long fringe can hit your shoulder when you turn your head.
Good drape
- Leave a little slack. Strands pulled tight behave like sticks. A strand should swing when you shake the earring.
- Keep thread tension even. If one strand is tighter, it will hang shorter than its neighbors.
- Add a little weight. A slightly heavier bead at the tip helps a strand hang straight, and a small drop bead makes a pretty finish.
Common beginner problems
- A strand is stiff. It was pulled too tight. Ease it by rolling the strand between your fingers, then give it a gentle shake.
- Thread shows at the tip. The strand is too loose. Pull it gently until the turn bead sits snugly against the bead above it.
- Strands twist together. Some twist is normal, and most of it settles with wear. Hang the earrings and let them relax.
- The second earring does not match. Count each strand again, and lay the two earrings side by side while you are working.
Where to go next
Try a color fade through the strands, or add a small motif to the brick stitch top. You can plan the top and the fringe together as one design in the ShineBead app.