
Brick stitch for beginners
Updated November 15, 2026
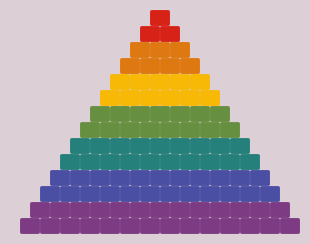
Brick stitch gets its name from the way its beads stack, like bricks in a wall. Each bead is attached to the thread between two beads in the row below, rather than to a bead itself. That makes it easy to widen or narrow the piece as you go, which is why it is the favorite stitch for shaped earrings and small charms.
What you need
- Cylinder beads, such as Miyuki Delica 11/0. Two or three contrasting colors make it easier to see what you are doing.
- Beading thread, such as a braided thread or a nylon beading thread. See thread and needles for Delica beads if you are not sure which to pick.
- A beading needle, size 10 to 12.
- Small scissors, and a mat that stops beads from rolling away.
- Ear wires and jump rings, if you are making earrings, along with two small pairs of pliers.
How the stitch works
Brick stitch starts with a foundation row called a ladder, in which the beads sit side by side. Between each pair of beads, the thread forms a small visible loop known as a bridge. Every bead in the next row hangs from one of these bridges, which is what pushes it half a bead to the side.
A row built this way naturally comes out one bead shorter than the row below it, so a basic piece narrows into a triangle without any extra effort.
Make the ladder
- Start with two beads. Cut about 1.5 m (5 ft) of thread. Pick up two beads and slide them down, leaving a 20 cm (8 in) tail.
- Stitch them together. Pass through both beads again in the same direction, so that they sit side by side with their holes parallel.
- Add a bead. Pick up one bead, then pass down through the previous bead and back up through the new one.
- Keep going. Repeat until the ladder is as wide as your chart’s widest row. Then weave back through the whole ladder once to straighten it.
Add the rows
- Start the row. With the thread coming out of the top of the ladder, pick up two beads.
- Catch the second bridge. Pass the needle under the second bridge from the edge, then back up through the second bead you just added.
- Lock the pair. Pass down through the first bead and up through the second, so that the two sit straight.
- Add one bead at a time. Pick up one bead, pass under the next bridge, and go back up through that same bead. Continue to the end of the row.
- Turn and repeat. Start the next row with two beads again, working in the opposite direction.
How to increase and decrease
- To narrow a row, do nothing special. Work one bead on each bridge, and the row comes out one bead shorter.
- To narrow faster, start the row on a later bridge, skipping one at the edge.
- To widen a row, stitch two beads onto the same bridge, either at the edge or wherever your chart gets wider.
How to read a brick stitch chart
A brick stitch chart looks like the finished piece, with each row offset by half a bead. Find the widest row first, because that is usually your ladder. Work from there toward one end, then turn the piece over and work from the ladder toward the other end.
Each row is read straight across, which makes these charts easier to follow than peyote charts. Mark each row as you complete it, and count the beads in a row against the chart before you move on. Our guide on how to read a bead pattern covers color keys and word charts too.
Turning it into an earring
Finish the top of the piece with a small loop of beads, or stitch a jump ring through the top row. Open the jump ring sideways with pliers, rather than pulling it apart, then link it to an ear wire. Weave the leftover threads back through the beadwork along a zigzag path, changing direction a few times, and trim them close.
How to size a piece
In brick stitch the bead holes run up and down. With Delica 11/0 beads, that gives you roughly:
- Width: about 6 beads per centimeter.
- Height: 7 to 8 rows per centimeter.
A 13-bead-wide earring is therefore a little over 2 cm (about 0.9 in) wide. Check by stitching a small sample, as tension shifts these numbers slightly. For a longer piece such as a bracelet, the bead calculator works out the rows and the total bead count.
Common beginner problems
- The ladder twists. This is common at first. Weaving back through the ladder a second time will straighten it.
- The edges look jagged. The first two beads of a row may not be locked together. Pass through them again, so that they sit straight.
- Beads lean to one side. Tension is the usual cause. Pull snug after each bead, but do not tighten so far that the bridges pucker.
- The piece is the wrong shape. Count the row against the chart, since one missing bead changes every row after it.
Where to go next
Once a simple diamond feels easy, try adding a fringe to the bottom edge, which turns a small charm into a statement earring. You can also try a motif with more colors in the same stitch, like our free heart earrings, the geometric triangle earrings or the snowflake earrings, or browse all our free bead patterns. The same ladder is also the starting point for herringbone stitch.